
If your copy of Google Chrome has taken on a sudden and inexplicable
hatred for Shockwave Flash, we’re here to help. Read on as we show you
how to tame Chrome and get it to play nice with Flash.
More so than other browsers, Google Chrome is particularly
susceptible to a specific but not uncommon situation in which it simply
will not coexist peacefully with Adobe Flash—frequent slow downs and
annoying crashes are common as a result. The following tutorial will
help you get Chrome back to its speedy self.
What’s Causes The Issue?
The reason we’re talking about Chrome and not, say, Firefox, is
because of the way Chrome handles Flash content. While other browsers
call upon the Flash installation of the host system, Chrome includes an
internal Flash installation. When everything goes smoothly this isn’t a
problem—the internal Flash installation is updated with every new Chrome
release.
Unfortunately things can fall apart pretty easily if Chrome gets
confused and attempts to utilize both the OS installation of Flash and
the internal Chrome installation of Flash. The result is serious browser
lag, temporary lockup, and then a browser-wide crash of all active
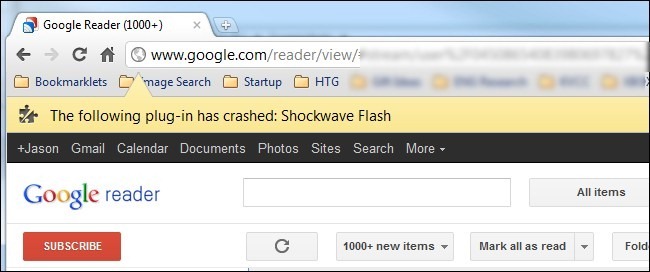
Flash instances. You don’t realize how many web sites use Flash until
every single tab locks up with a crash warning—”The following plug-in
has crashed: Shockwave Flash”
How Do I Know A Conflicting Flash Installation Is Causing The Crashes?

First of all, despite the warning about Shockwave, the actual warning
has nothing to do with Adobe Shockwave which is a separate
program/multimedia system from Adobe Flash. Second, while not every
instance of Flash flaking out in Chrome can be attributes to a Flash
install conflict, we’ve found it to be the most common reason users are
experiencing Flash-related problems.
How can you tell if a Flash conflict is the source of your trouble? Run Chrome. In the address bar, type about:plugins
in the address bar. After you press enter you’ll be greeted with a list
of all the plug-ins installed in Chrome (this is different than
user-installed Extensions). Look down the list of plug-ins for the Flash entry. If the entry looks like Flash (2 Files) there is a very good chance the source of your Flash-related crashes is a conflict between the two.
In the upper right hand corner of the browser window there is a small toggle labeled [+] Details. Click on that toggle to expand the entries for all the plug-ins. Return to the entry for Flash.
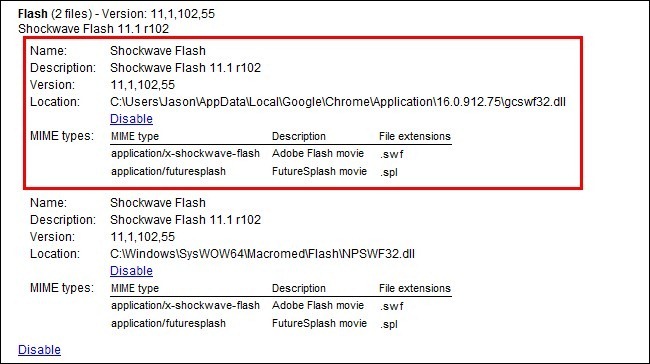
You should see something like the screenshot above: two entries for
Flash, one for the internal Chrome installation (highlighted in red
here) and one for the host OS’s installation (seen below the highlighted
entry).
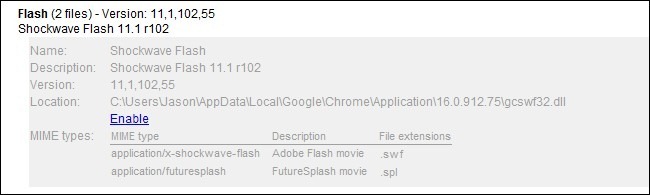
You need to click on the Disable link for Chrome’s
internal installation of Flash (make sure you disable the one located in
Chrome’s AppData folder and not the separate stand-alone Flash
installation). Once you do so the entry for the internal installation
should look like so:
Go ahead and close the tab and then close Google Chrome. Restart Chrome
and resume normal browsing—visit Adobe’s test page to ensure everything
looks good:

Remember, you’ll no longer be getting automatic updates with each Chrome upgrade. Make sure to check for updates at Adobe’s Flash download page and/or turn on the update check in your local installation of Adobe Flash.
If for whatever reason disabling the built-in Flash doesn’t help, we
suggest playing around with different combinations. Try turning off the
OS Flash installation instead of the built-in Flash installation for
example. Also, try visiting a flash-based web site while Incognito Mode
(when you enter Incognito Mode it turns off all your Extensions which
may or may not be causing issues with Flash). Finally, as a last ditch
effort, you can reinstall Chrome (if Flash works in every other browser
but Chrome, this is likely the only option you have left).
No comments:
Post a Comment